Monday 29 February 2016

Organize Yourself with this Fabric Basket Tutorial

I'm an avid crafter, so there's no shortage of craft supplies in my home workstation. Sometimes the clutter on the table gets to be too much, and the next time I go out I'm tempted by all manner of cute organizational bins and baskets. But sometimes, I don't really see what I'm looking for. I wanted a small, but cute basket to house my knitting essentials, and, as you can see below, with a bit of imagination and effort, I was able to make my own customized storage baskets. You can too, just follow along with the instructions ;)

$5 DIY Organizer Basket

Materials:
  • A fat quarter (18 x 22 inches) fabric of your choice.
  • A fat quarter (18 x 22 inches) of lining fabric.
  • Thread
  • Scissors 
  • Template (below; the pattern includes 1/2" seam allowance)


Free template for $5 DIY Organizer Basket

These are the dimensions for the basket's template. Using a ruler, trace the measurements for the main fabric and lining patterns into a piece of kraft paper (a nice strong paper that will last). Once you cut out the template you will end up with 2 pieces just like the ones above.


Fabric for $5 DIY Organizer Basket


Here you can see the two squares of fabric which you will cut according to the template you created. On the left side is the main fabric I chose; I found this fabric at my local fabric store and it was only $3.00 a meter. This fabric is a medium weight canvas, therefore I didn't use any kind of interfacing. It was stiff enough on its own to keep the shape of the basket. The lining was a left over from another project. Total cost of this project was $5.00. I still have some fabric left to make a couple more of these cute and handy fabric baskets. =)


Fabric cut according to template


Place the pattern on each piece of fabric and cut one of each. One lining and one main fabric as shown above.


Fabric pieces stitched together


Fold the main fabric in half with right sides together and sew the sides. Repeat the same steps with the lining. I used contrasting color thread on both pieces for you to visualize the stitch line and the 1/2" seam allowance.


Basket once it's sewn together!

Fold the corners and sew them to create the sides and the base; repeat the same steps with the lining. Turn the main piece right side out. After you sew the corners of both main fabric and lining,you will end up with a rectangular basket like the one shown on the right side of the picture above.


Add the lining to the basket


The lining extends 2 inches up over the edge of the basket. Fold and press the top edge of the lining over 1/2 an inch, like a hem. Insert the lining inside the basket and fold the remaining 1.5 inches down over the edge of the basket as shown in the picture on the right. Top stitch with your sewing machine at 1/8 of an inch from the lower edge of the fold, all around the basket to attach the lining to the basket. You can also glue the fold in place, it is much easier. Press the inside of the basket with a steam iron, one side at a time, (except the bottom) being careful not to burn your hands.


Final Product! $5 DIY Organizer Basket


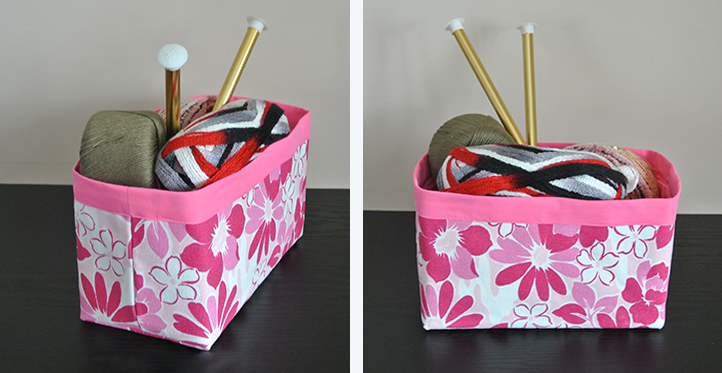
This is the finished piece. You can see how the 2 extra inches of lining fabric, once folded over, becomes the finishing edge of the basket. Now you can use your basket to store your crafting/sewing supplies, or your yarns like I did. You can use it for just about any storage purpose!

Happy sewing!


Friday 12 February 2016

A Valentine's Day Feast


Next Sunday is Valentine's Day and I know that many of you have been dreaming up your menu of treats and eats that you'd like to share with family or friends on this special day. In case your menu is still a blank slate, here are a few recipes that I'd like to share with you; maybe they will inspire you!

Chocolate Chiffon Valentine Cake

Valentines Jello Hearts

Easy Valentine's Day Mini Cakes

Raspberry Chocolate Cupcakes

Chocolate Cover Pretzel
Valentine's Dipped Rice Krispies Treats


Wednesday 10 February 2016

Valentine's Day: Mocktail Hour

Today I'd like to share a collection of mocktails which you can whip up to surprise your sweetheart, family or friends on Valentine's Day.

They're easy to prepare (just pour in all the ingredients listed!) and, since they contain no alcohol,they're perfect for sharing with the entire family. They're a gem to look at too, with vibrant colors that will certainly be appealing to little ones. Let's hop to it!


Raspberry Sherbet Party Punch

Valentine's Day Smoothie

Cupid Floats

Love Potion #9

Pink Velvet Hot Chocolate

Red Hot Jello Joy

Layered Strawberry Jello Cups

Monday 8 February 2016

Get Crafty for Valentine's Day: Quick, Easy and Cute Ideas

Valentine's Day is just days away and we could all use some fresh ideas to make some sweet gifts for our loved ones, or maybe to add a touch of whimsy to our home decor. Here are some quick and simple ideas for decor or gifts that you can make for Valentine's Day. These visually pleasing tutorials are great for crafters of all ages and skill levels. Surprise your friends and family this Sunday, with one of these cute gifts. 

DIY No Sew Valentine Love Pillow Cover


Mini Heart Pinatas


Easy 10 Minute Valentine's Day Wall Art


Cupcake Liner Cards


Wall of  Paper Hearts
        
Beat of My Heart Tee


Cheese Valentine Card

Valentine Pouch